

Changing Eyes on a Gotz Happy Kidz Doll
- BbeautyDesigns

- Jun 25, 2025
- 8 min read
Updated: Jul 15, 2025
I am a great fan of the blowdryer method as a go to for many doll customizations and repair as it's easy and quick and requires no clean up.
I'm working on a Gotz Happy Kidz Emily. She comes with blonde rooted hair and brown eyes. With the Gotz Happy Kidz, there are not a lot of combinations in terms of hair color and eye color and it gets somewhat limited. But as we know, learning customization skills opens the door to having as many options as you would like in the face and body molds manufactured. Having access to a whole array of eye colors and conversion to a wig makes color combinations endless.
The first thing to know about a Gotz Happy Kidz is that they have articulation in the elbow of the arms and the knees of the legs. This is one of the things I love compared to American Girl 18" dolls because activities like being on a bike, car, or horse, those legs stick straight out awkwardly, but a Gotz doll can be posed more natural including tilts on the head rather than just a typical side to side. Not all their molds are fully articulated, but they all make fabulous customs.
In starting to take my Emily apart, I initially watched this video as it was the only one I could find talking about taking a Gotz apart. It was the perfect introduction to watching someone take the head off and see what's inside. When she gets to putting the eyes in, I could almost feel her frustration as the eyes kept slipping off her finger and I felt sure there had to be a better method.
The first thing I wanted to test is if using the blow dryer method could skip all the boiling water and make the process faster. I started with a small area of table surface and got out my blow dryer and pointed it about an inch away from the neck and bottom of the chin. I let the vinyl get hot for about 5 minutes and it softened right up (this is my blow dryer on heat high). The neck did not need to be super squishy in order for me to complete my next task. I had two types of pliers ready, one with a curved edge and one with a straight edge. I ended up using both. The hole on the head is only wide enough to get about 2 adult fingers up in there, but first you need to pry out the head cup. It's a white piece about an inch and a half wide and it sticks upside down up inside the head. To get it out I used my curved pliers to open the head vinyl just a little bit to reach in and grab the edge of it and pull down. Once it was visible out of the hole I used the straight pliers to grip it better and pull it all the way out.
So why do I use the blow drying method? It's simple - blow drying is so much quicker. You don't have to wait for water to boil and boiling water cools dropping temperature pretty quickly. A blow dryer applies hot dry air consistently and only stops when you turn it off. It's safe to use in reheating dolls as long as you stay an inch away, and heats to the temperature we need within seconds. There is also no cleanup and no dishes or towels needed, and you don't need to worry about spills or splashes. I also love that I can do it anywhere and not have to worry about staying in the kitchen or close to a sink.
So moving on:
When you've pulled the cup all the way out it plops down like a cap on top of the neck and two long elastic pieces stick straight out of it with a zip tie. If your doll's stringing is loose, undoing the knot on top and pulling upwards will be a simple fix to pull up the slack without taking apart the whole doll.
With the head off you can really see what is going on inside. The Gotz eye socket is done so that eye lashes are glued to the eye lid and the back of the socket is open. Using your blow dryer again, aim at the eyes from the front and soften the vinyl. The original eyes have been glued inside the sockets. The heat from the blow dryer will loosen it, but you will have to push the eye fairly hard from front to back to get it out for the first time. Sometimes the glue will come with it and the eye will be dangling at the end of a glue strip (creepy right?). I found that shaking the eye out from inside the head never quite worked, so I used a pair of tweezers to catch the eye and pull it from the head. If it's still attached to a glue strip, I find that clipping the glue with a small pair of scissors is more effective than trying to yank it with the tweezers.
So what kind of eyes are these? The stock eye is an 18mm acrylic globe eye roughly 3/8" wide on the iris. If you've read our article on eye sizes you'll know there is some play in eye sizes. Sometimes dolls are manufactured with an iris size that is rather large to evoke the "doe eye" look. You can stay at this size or go a size down to reveal a more proportionate white of the eye to the face. Don't feel like you have to get the same exact thing as the stock eye. You have options!
TESTING EYES
I wanted to experiment with a few different options to see what works the best. These globe eyes are pretty large white all the way around so I wanted to start with the same size but a different shape. I started with an 18mm flat glass eye. This is similar to what the woman in the above video was using to replace eyes. Now it seems easy to just stick an eye at the back of the socket but that glass eye was really slippery on my two fingers fitting through the neck hole. Now it makes perfect sense why she was continually having to try to stick it to her finger with putty and why it kept slipping away. Because the neck opening is so small you are navigating a balancing act from outside the head through the neck hole and to the back of the socket to push it into place. It makes it incredibly tricky to safely get the eye that distance and with the angles, but it is possible and the flat back eye does work. But I will say, there is lots of space behind the flat back eye to cause it to move or tilt backwards so you either have to put craft putty behind it or plan on permanently glueing it in place so that it doesn't move after you put it in.
The next eye I tried was a 16mm globe eye. Although just a few mm short of an 18mm, I found that the circumference of the globe was significantly smaller, and the iris looked small as well so I didn't like the look of it at all. I don't use globe eyes a lot so I tried to find an 18mm online and wasn't happy with anything I found. The globe eyes I found were not as detailed and expensive and I was determined to find a better option.
The next eye I tried was a 20mm half dome eye. This was a bit bigger of an eye size than the original, but it did actually work. The half dome shape popped right into the socket without the need of glue and it was much easier to get in and back out. It was very secure and it didn't stretch the vinyl at all. Although this was a working option, I did feel that the pupil size was just a tad too large for my taste but knowing that the half dome worked opened up a lot of options.
FINAL EYES
For the final eyes, I went with an 18mm half dome eye. This was my favorite because of the pupil size proportion, but also the accessibility to different realistic color combinations. Also I love that the half dome stays put without the need of glue. It's also satisfying to know that I can easily change the eyes at any time by reheating the head and sockets and change eye color. I chose Poly Glass Half Dome Eyes in Woodland Green. When I change eyes I often select a shade of blue or of green. Most of the time, dolls come with a brown eye as the original and the blues and greens are less common. Brown also has a tendency to look very dark in photos, sometimes creating the effect that there is no eye at all unless you light it properly, so I find choosing brighter colors like green and blue make taking photos of my doll models much easier and clearer.
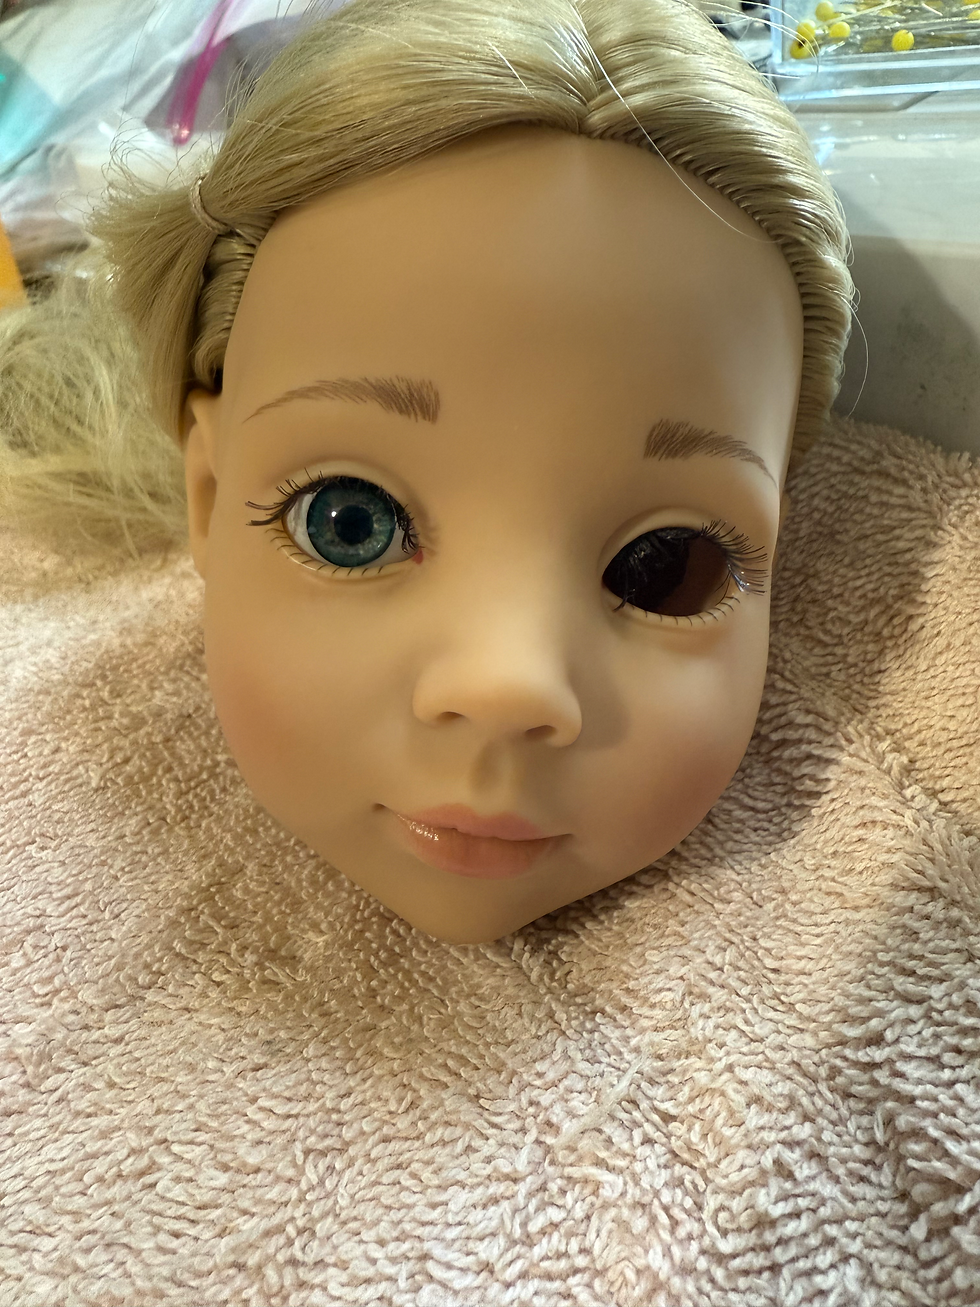
The Woodland Green eye as seen above is really pretty in person. I put in only one eye for the purposes of showing the eye socket with just the lashes to show that they remain in place when changing the eye. You of course can also choose to change the eyelashes at this point in time as well to do something more dramatic. For the Woodland Green eye, there's a mix of blues and greens and the faintest touches of copper just around the pupil. The fine lines of the iris make it look incredibly realistic. This eye is a Poly Glass which means the eye is designed to look like a glass eye but also hold all the detail we see from acrylic eyes. The eye almost looks 3D. The white is much more porcelain looking than an acrylic eye and the iris looks like it's dropped down more, as if it has more depth when looking in the eye. Acrylic eyes look very surface level and the whites look much more plastic than glass. Nevertheless, acrylic eyes are still beautiful and they cost about half as much, so it really has to do with how high end you want your custom to be and how much cost you want to add to upgrade her to make your final decision on her look. In the above photo she still has all her original hair and she can still be a beautiful custom with only an eye change, but she also could transform more by switching her to a wig and giving her a face up and custom outfit.
After you have both eyes in and positioned the way you want them, just let the head cool. When the vinyl returns to it's cooled state it will lock in the half dome eyes into the sockets and they won't move. No additional steps needed.

Now what to do next depends on whether you are doing other customizing tasks such as doing a face up or removing the hair, etc. But if you were only changing the eyes you will need to do a reverse step to get the head back on. You will want to use your blow dryer to soften the neck opening on the head, and then using your pliers and a steady hand, insert the cup back into the head. This will involve pulling the cap away from the neck to stick it up into the head and pop it into place. Then as before, letting the head cool will lock it from not coming back out.


Comments