

Building a Steampunk Jet Pack for American Girl and 18" Dolls
- BbeautyDesigns

- Nov 1, 2025
- 7 min read
Steampunk fashion has an industrial design and innovation element paired with a mash-up of Victorian and Edwardian fashion elements. If you've ever been to a human sized Steampunk Convention, one of the coolest parts (and visuals) is all the gadgetry on display. From industrial looking wings, to potions on a leather belt, to tools crafted in copper, aluminum, and brass tones, it's hard to have steampunk flavor without that element. Do they have that for American Girl Dolls? No. Well not yet anyway, so we are going to show you some DIY to create your own Steampunk Jet Pack to show off your skills and your gadgetry.
**Note that all the supplies below are available from Hobby Lobby

Supplies:
2 Empty spray bottles approximately 6.5" Tall (a 5oz/150ml bottle is what we used).
Quick Drying Super Glue like Loctite Gel and e6000
2 Craft Metal Christmas Bells
1 Compass head or gauge dial approximately 2" circumference (Explorer by Traditions)
1 Package of Hot Fix Studs in Gold SS30 by Design Loft
2 regular rubber bands
2 Black Metal Rivets (Male Side)
Rustoleum Brown Spray Paint 2X Espresso
Acrylic Paint in Metallic Copper and Bronze (Colors: Worn Penny and Rich Espresso by Decoart)
2 yards of Brown Studded Trim by Merchant 41 (Suede Stud Trim)
Leather or faux leather of your choice
2 18" doll sized belts in black
Green clay or slime.
2 tiny snaps
5/8" Twill Tape 15" in Black
Step 1:
Take apart the two empty spray bottles by removing the nozzles, caps, and hoses off the tops. Disconnect the plastic hoses and set aside. Keep the caps.

Step 2:
Take out the 2 Craft Metal Christmas Bells. Using the Loctite Super Glue Gel, coat the inside of each of the bottle's tops with super glue. Insert 1 Christmas Bell with largest side (bottom) flaring outwards with the top of the bell inserted inside the bottle. Repeat for the other bottle. In this exercise, the bottom of the bottles will become the top of your jet back, and the bells flared out will be the bottom of your jet pack. Let dry.

Step 3:
Set the bottles flat on a table top and line them up so they are side by side. Add e6000 glue to the middle to glue the bottles together.

Rubber band the bottles together about 1" up from the bottom and 1" from the top not taking the "screw top" area of the bottle with the attached bell. Rubber band around twice for a secure hold and let dry. This should form a nice area in the middle around 2" in diameter where we will attach the gauge later on.

Step 4:
Using an empty box or a painting area, lay the bottles down flat and paint with brown spray paint (yes include the rubber bands they will be a permanent part of the look). After the top dries, rotate the unit to paint all other directions until the unit is fully spray painted dark brown.

Step 5:

Using the "Worn Penny" Paint, lightly brush stroke the metallic paint over the bottles in a very thin layer. Seeing the brush strokes creates a nice effect, so use very minimal paint and brush stroke the paint until your brush is dry, changing direction around the bottom cylinders and it will create a tarnished metal effect. Brush over the rubber bands so they look like wiring. Brush stroke inside the bells as well to give them a rusted effect. Use the "Rich Espresso" paint as an accent to brush in random areas on the jet pack tanks.

Step 6:
Choose which side you like best as the side that will face outward, and your less favorite side which will get glued to the harness.
Step 7:
Making the harness
There are several ways you can make the harness. You can cut up 2 black belts made for 18” dolls or you can hand cut your own straps using these measurements to make your own.
2 strips 11” long x 1/4” wide
2 strips 3” long x 1/4” wide (3.5” if making your own)
2 mini buckles (optional if making your own)
Hot Fix Studs


Step 8:
Cut a 3" x 3" Piece of Leather/Vinyl. This will be used to secure the jet pack to the harness.

Attach the cut ends of the belts or your vinyl strips to the square and sew on the left and right sides of the square.

**Above using hand cut strips

Step 9:
Cut an 18" long piece of twill tape and attach it to the bottom of your square at the center by sewing a "box" shape.

Step 10:
Drape your harness over your doll to get correct placement of the front straps over the chest. At the back your square should hit at your doll’s waist. Straps should be approximately 1/2” apart.

Step 11:
To secure the pieces, we just used a hand sewing needle and ran it through both belt pieces in an X formation and knotted at the back. Sew small snaps on the other side, lining up the straps. This is helpful to do when it's on the doll so you can align everything. Sew the male side of the snap onto the buckle side straps under the buckle. Sew the female snap to the opposite strap. Bring the twill piece around from the back and fold the left side in and sew it to the back of the strap. There will be excess to adjust. Cut off any excess.

For the right side, align the twill tape to the desired tightness and sew to the right strap leaving the excess hanging open like the short belted straps.

If you've done everything correctly, the jet pack will open completely in the front and come on and off like a backpack.
Step 12:
Cut a 2" x 2" leather or vinyl square.

Step 13:
Cover the leather square in e6000 glue on the wrong side. Lay the jet pack down on top lining the rubber band area as the top and bottom to attach to the square. Set a weight on top and let dry.

Step 14:
Grab your harness and cover the right side with e6000 glue and glue it face down to the jet pack so that the wrong side is facing out. Align it between the rubber bands. Let dry.

Step 15:
Using the studded trim, start from the backside of the jetpack. Lay a line of glue that goes from the back square around to the edge of the front square edge following the line of the rubber bands and then back around. Glue down trim. Do the same for the top of the square to create a border. Use the trim to measure the short sides and glue down trim so that the raw edges of the front leather square are all edged by studded trim to form a frame.


Step 16:
Cut the ring off the compass or gauge.
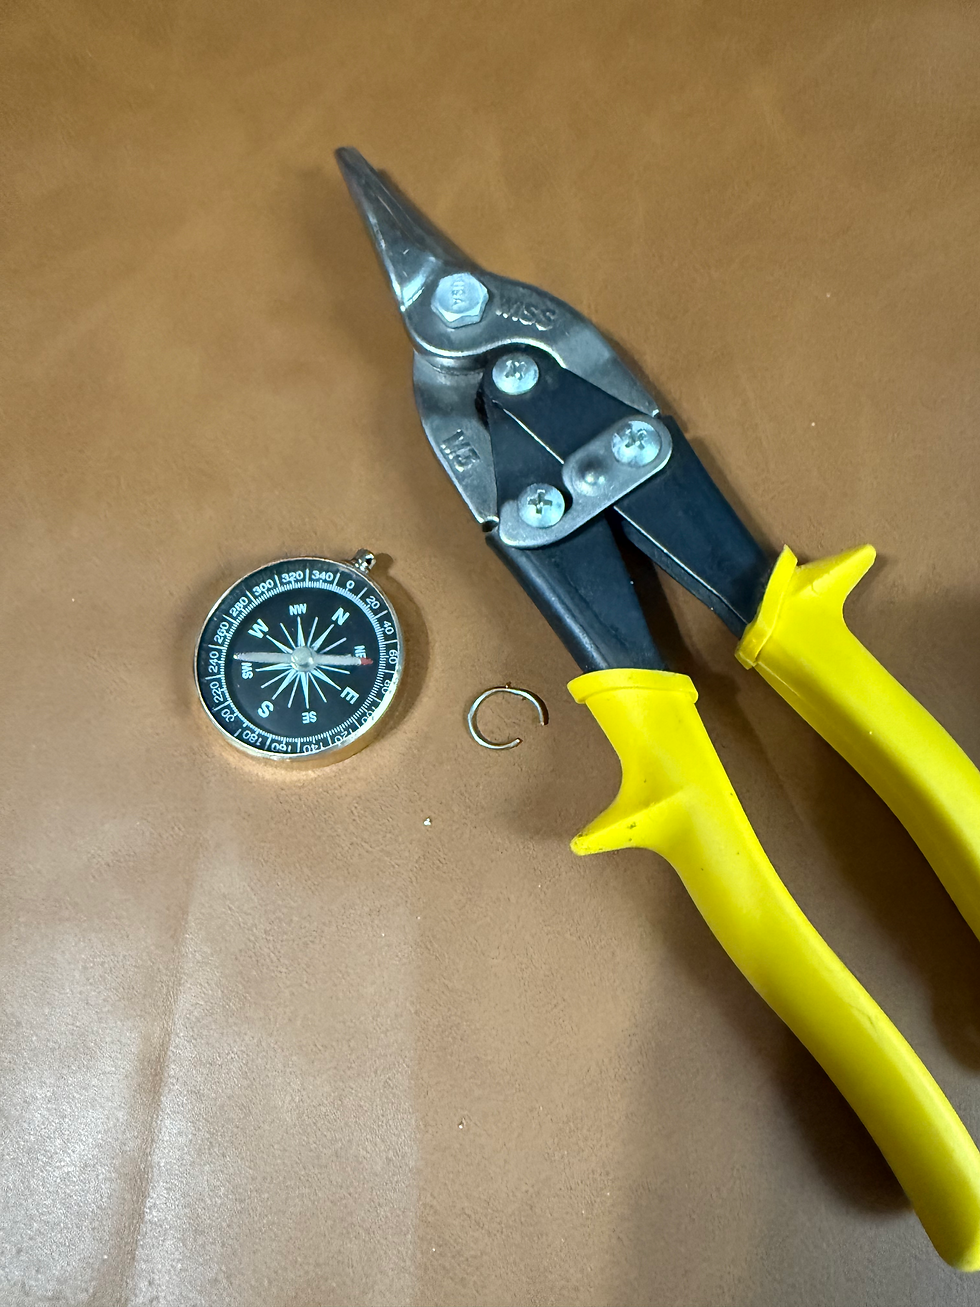
Cut a piece of studded trim and glue around the sides of the gauge using either super glue or e6000.

Apply a generous amount of e6000 to the back of the gauge once the trim is on and glue it to the square making sure that the N is pointing towards the flat top of the jet pack tanks and the S is pointing to the bottom towards the bells. If using a gauge use the same method to make sure your gauge numbers are pointing the right direction.

Step 17:
Take the spray bottle caps set aside in Step 1. Fill them with green clay or slime. Add a generous amount of e6000 on the flat tops of the jet pack tanks in the center. Glue the green filled caps with the open bottom glued to the flat surface of the tanks. Glue a black grommet to the top of each of the cap tops and fill with glue. Stick one hose set aside from Step 1 and stick it in the center of the grommet and let dry.

Note: Repeat for the other side. You will not be able to bend the hose into the other side grommet until the glue completely dries otherwise the grommet will slide around and won't hold steady. This requires a little patience as you need to dry one side at a time. You can also heat the hose in this position using a blow dryer to have the hose heat and cool in this position to help it not want to pull straight. I found the e6000 was best for this step and I held for about 10 minutes to allow the base of the cap to partially dry in position. I also added glue around the bases of the cap to help secure them down.

Variation: Decorating your jet pack can have many variations. We've chosen to mimic the green fuel with a solid clay, but if you wish to have a real green liquid, you'd need to glue a container that is permanently sealed and use that instead of the caps. You can also decide to glue something else at the top of your jet pack as well. Get creative!

I found that tying a piece of elastic over the cap and securing to the bottom helped keep the cap in place during drying so that it did not lift up from the strain of the hose.
Step 18:
Once your jet pack is dry, you can choose to add additional embellishments such as the hot fix studs to decorate the jet pack and the harness or glue additional items to it. We want you to get creative!

You are finished!


Comments